 I like stuff that works the way it's supposed to.
With its light leaks and distorted, vignetted pictures, the original Holga gained a cult following for its results- and a reputation for being a terribly-built little machine that might or might not produce usable results on any given roll of film. At least it was honest: it never promised anything other than the occasional lucky accident. And if you knew its limitations, you could use it to take pictures with some degree of confidence.But I had my suspicions, when I saw the 3D Holga, that the same company which could barely build a simple camera had decided to produce a more complicated version. Making one shutter trip when you press a button is one thing, but synchronizing a pair of shutters is quite another. Would it even work? Much to my surprise, the 3D Holga actually does work- and it works well. The pictures it produces are exactly what you'd imagine: distorted, vignetted, and occasionally discoloured, just like you'd see from the original, except in 3D.
It works by taking two side-by-side 6x6cm images at the same time, which means you get 6 pictures per roll of film. The two lenses are focused individually, and film advance is accomplished the old-fashioned way, reading numbers through a little red window. It's all as simple as can be.
 The camera is very similar to the standard Holga, with the same lens (times two) and the same general body shape and build quality. But like the Holga Wide Pinhole camera, which we wrote about last month, there have been a few improvements: the shutter button is now equipped with a built-in cable release socket, the dual flash units have the later Holga's built-in colour wheel, and the extra heft makes the camera feel a bit more substantial.
 The manual recommends using 400-speed slide film, which can later be cut and fitted into 3D slide mounts for viewing with the (optional, $39 +tx) viewer. But you can shoot negative film just as easily, and view the prints or scans by other means, including the entirely free (but somewhat undignified) method of crossing your eyes. I'm still experimenting with viewing techniques, so watch this space- I'll try to post any breakthroughs.
 In the meantime, the 3D Holga is probably the cheapest way to get big, bright medium-format stereo pictures, and I'm having a great time with mine. More sample pictures are available here.
The 3D Holga includes a cable release and two lens caps- plus an instruction manual- and it's available now for $169 +tx.
Contact us or stop in to our shop for more information.
We've got a few interesting cameras to feature this week. I'll start with my favourite:
 The Optina Ic is a compact, fixed-lens rangefinder camera with a streamlined design that seems inspired by mid-century science fiction movies.
The body is satin chrome with bright chrome accents and black leatherette. With its bottom-mounted wind lever and top-mounted (but retractable) rewind knob, the Optina sports a very clean and distinctive silhouette.
The lens is a 50mm f2.8 Isco-Gottingen Isconar. Shutter speeds are accurate and the rangefinder is clear: this is a fully usable camera that only coincidentally happens to look like a robot from the moon. The price is $69 +tx.
 This Rolleiflex T is a very nice classic TLR. Its 75mm f3.5 Zeiss Tessar is clean and sharp, and its shutter works well from 1/4s and up (though the 1/2s and 1 second settings are a touch slow.) The body is in very nice condition, and the controls operate smoothly.
The Rolleiflex cameras are some of the finest medium-format twin-lens reflex cameras available, taking big 6x6cm exposures on 120 rollfilm. Their quiet, steady shutters are excellent for discreet or low-light photography, and their workmanship is top-notch. If you've wanted to see what medium-format photography is about, here's your chance.
This camera is ready and able to shoot great pictures, but its minor low-speed shutter issue means that it's bargain-priced at $169 +tx.
 If the Rolleiflex sounds a bit too complicated, you might enjoy this Spartaflex. It's a stripped-down, box-style camera with a few notable differences: for one, it uses common 120 rollfilm instead of the discontinued box-camera standby, 620. For another, it features adjustable apertures to control your exposure and depth of field. And it even has a true focusable lens in the twin-lens style. It's kind of like a Rolleiflex, but maybe a bit more fun.
The Spartaflex includes a flash and one flashbulb, which I'd recommend saving for a special occasion. Still, it makes for a good-looking package, and it can be yours for only $89 +tx.
 Finally, we have this beautiful, nearly like-new Olympus OM-2. If there's a single thing you need to know about the OM series, it's that they have a phenomenally large viewfinder- probably the biggest, brightest image you'll see in an SLR. But of course, there's more to it than that.
The OM-2 is a surprisingly compact, solid-feeling camera backed by a system of exceptional (and, in my opinion, underrated) lenses. The camera's shutter speed settings are unconventionally located around the base on the lens, on the front of the camera- not on the top like most cameras. It may take some getting used to, but you'll see why it's a good idea as soon as you hold the camera to take a picture: the focus, aperture, and shutter speed controls are at your fingers.
The OM-2 is a great choice if you're looking for a manual camera, and there aren't too many examples in such clean condition. Our price, including a nice Zuiko 50mm lens, is $249 +tx.
If you're interested in any of these cameras, or if you have any questions, be sure to contact us by phone or e-mail as soon as possible: we only have one of each of these cameras, and once they're gone, it may be a while before we find another.
This is only a tiny sample of our inventory. We get dozens of new items a week, and you can see a frequently-updated list at www.camera-traders.com
 This trick has made its way around the web a few times, but it's still a pretty neat experiment that not everyone is aware of: developing film using instant coffee.
The recipe calls for some instant coffee granules, washing soda, and water- that's it. For anyone who sees darkroom chemicals as mysterious black-box alchemy, it's a bit of a revelation that standard household chemicals can pull an image off a roll of film.
Instant coffee is available pretty much everywhere (I found an old container in the cupboard). Washing soda- not baking soda- used to be nearly impossible to find in Victoria, but I found some at both Fairway Markets and Thrifty Foods. It seems that it's been rediscovered as an economical and environmentally-friendly cleaner, which is good news for anyone interested in scrubbing up grease or developing film.
So here's the setup:
 We have an exposed film (Fuji Neopan 1600 exposed at ISO 800), a developing tank, coffee, and washing soda. Not shown, but also necessary: some fixer, and a dark place to load the film into the tank. You can use stop bath if you want, but since we're on an all-natural kick here, I've used plain water.
The developer mix is 5 teaspoons of coffee and 2 teaspoons of washing soda in 300ml of water, enough to fill the developing tank to the appropriate level. Fair warning: it smells like day-old pan grease.
Developing time is pretty long (20 to 30 minutes), and fixing time in water is not exactly speedy either (I gave it roughly 10 minutes), but the final results are actually kind of interesting.
The negatives themselves are heavily stained and extremely dark, and the images are low in contrast and fairly grainy, but they also have a look that's very much unlike what you'd get out of a modern purpose-made developer.
The look is pleasant and luminous, and the images display well both on paper and on screen. If you're at all interested in processing film, this is a method I'd highly recommend- not only for its novelty value, but for the very nice results.
Easy-to-follow instructions are available here on the excellent Photo Utopia blog, and the results from my own roll are here.

You may have noticed that we're now offering equipment for rent. Renting is a great way to get access to equipment that's too expensive, uncommon, or strange to justify a full purchase. For example, everyone wants to play around with a fisheye lens, but not too many people are willing to pay the $500-$900 it takes to buy one. That's where renting comes in handy.
We're starting out mostly with a selection of lenses for Canon EOS and Nikon, the systems for which we've gotten the most requests.
Our Canon lenses include a 15mm f2.8 fisheye lens ($30 a day) and the 100-400mm f5.6 L ($35 a day)- plus the very unique 65mm f2.8 MP-E super-macro lens ($25 a day) that provides magnification starting at 1:1 life-size and extending all the way to 5:1. You have to see in action to really appreciate it.
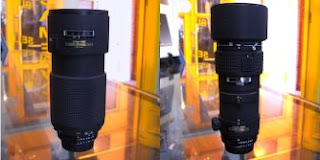
 Nikon lenses include the 80-200mm f2.8 AF-D ED ($25 a day) and the 300mm f4 AF ED ($20 a day)... mostly telephoto choices at the moment, but we're working on finding some good wide-angle lenses.
We've also got a single Minolta/Sony Alpha lens, but it's a nice one: a 16mm f2.8 fisheye lens. It's not an easy lens to find, and it can be yours for $30 a day.
 If you need lighting for a shoot, we have available a two-strobe Multiblitz Compactlite outfit with umbrellas and stands. This is a great portable outfit for studio or location work, and it's renting for $40 a day.
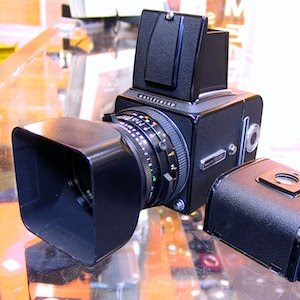
And if you're interested in trying out a nice medium-format camera, you can take home a Hasselblad 500c/m for $40 a day- including two film backs and an 80mm f2.8 lens.
There's plenty more available, too. Visit our rentals page for a full list and a downloadable copy of our rental contract- and keep checking back, because we'll have more gear available soon.
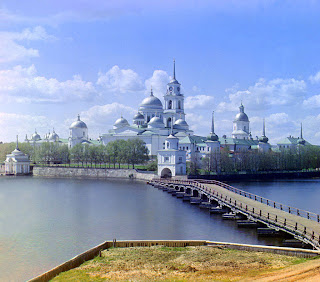 This picture (and the series by Sergei Mikhailovich Prokudin-Groskii viewable here courtesy of the US Library Of Congress) were taken in the early 1900s, long before colour film was invented. But the colours you see are real, not painted in or faked. These images were made on black and white film by a process I'm going to try today, using this:
 That's a film camera, a roll of black and white film, and three colour filters. How is it possible to take a colour picture with this setup? A quick primer on colour theory might help- or you can skip straight to the instructions a bit further below.
In the additive colour model, the three base colours are red, green, and blue, and every other colour is a product of their interaction.
If you consider what happens when you mix red, green, and blue paint, you'll probably wonder why that makes any sense at all: you'd end up with some weird shade of brown. But light isn't paint, and it behaves quite a bit differently.
If you can still remember your high school physics classes, you'll probably remember that bit about how white light contains all visible wavelengths. Essentially, white light is every colour.
So it stands to reason that by variously combining the three base colours, we should be able to create white (with full intensity red, green, and blue) and black (with zero intensity RGB), plus any colour in between.
Let's put that theory to the test.
If you want to try this, you need
- A film camera
- A tripod
- Red, green, and blue filters
- A roll of black and white film
You'll also need to find a colourful scene with minimal motion, because we'll be taking three separate exposures. Landscapes are a good bet, but anything will work as long as it's not going anywhere for 10-30 seconds.
Mount the camera on the tripod and compose your image.
We want to keep the exposure the same through three separate pictures, so keep your camera on manual exposure mode. Meter and set your exposure through one of the filters if you have a TTL meter, or adjust your reading for the filter factor if you're using a hand-held meter.
Now, hold the red filter in front of the camera's lens, and take a picture.
Wind carefully to the next frame, taking care not to jostle the camera, and do the same thing with the green filter in place of the red.
Wind carefully to the next frame and take a picture through the blue filter.
You now have three pictures of the same scene: one filtered through red, one filtered through green, and one filtered through blue.
Process and scan your film, or have the lab do it for you. The rest of the experiment will happen in your photo editor of choice (Photoshop or GIMP)
Open your red, green, and blue-filtered images in your image editor. Convert them to grayscale, and then create a new 8-bit RGB image the same size as your scans.
In Photoshop, you should see a "Channels" tab on one of the right-hand toolbars; select and copy your red-filtered image, and paste it into the new file's "Red" channel.
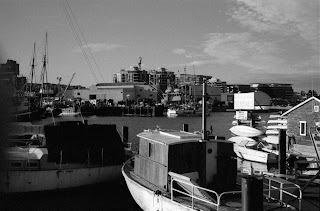
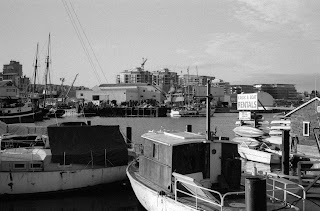
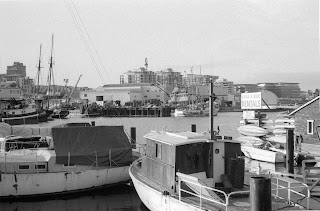
Now paste the green- and blue-filtered images into the Green and Blue channels, respectively. After some aligning, this happens:
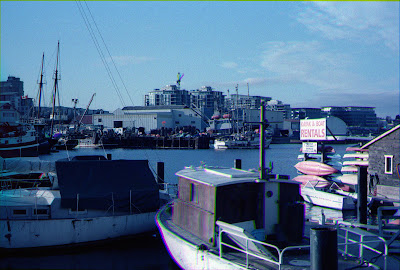
Not too bad for a first try. The colour fringing happens when something moves, like the boat in the foreground drifting slightly or the crane in the distance spinning- but when everything lines up, it looks surprisingly good. Higher-resolution pics are here if you want a closer look.
So it works, and it's a lot of fun- and even the colour fringing artifacts could be useful for spcial-effects or creative shooting. Give it a try!
 I like stuff that works the way it's supposed to.
 Much to my surprise, the 3D Holga actually does work- and it works well. The pictures it produces are exactly what you'd imagine: distorted, vignetted, and occasionally discoloured, just like you'd see from the original, except in 3D.
 The camera is very similar to the standard Holga, with the same lens (times two) and the same general body shape and build quality. But like the Holga Wide Pinhole camera, which we wrote about last month, there have been a few improvements: the shutter button is now equipped with a built-in cable release socket, the dual flash units have the later Holga's built-in colour wheel, and the extra heft makes the camera feel a bit more substantial.
 The manual recommends using 400-speed slide film, which can later be cut and fitted into 3D slide mounts for viewing with the (optional, $39 +tx) viewer. But you can shoot negative film just as easily, and view the prints or scans by other means, including the entirely free (but somewhat undignified) method of crossing your eyes. I'm still experimenting with viewing techniques, so watch this space- I'll try to post any breakthroughs.
 In the meantime, the 3D Holga is probably the cheapest way to get big, bright medium-format stereo pictures, and I'm having a great time with mine. More sample pictures are available here.


