Infrared photography is getting more and more popular, and with good reason: it's a lot of fun, and can give some fantastic effects. There are plenty of ways to shoot infrared, both film and digital. Our last update mentioned our stock of infrared film, which makes shooting IR pictures as easy as dropping a roll of film in your camera and attaching a filter.
But if you want to shoot digitally, you've got a few options. Digital sensors are actually very sensitive to infrared light, and the only reason you can't just go ahead shoot IR with most cameras is a simple filter placed in front of the sensor. So to shoot infrared with a digital camera, the trick is to somehow remove that filter.
You can have a DSLR modified- an expensive proposition- or you can use a simple point-and-shoot camera and get a similar effect. So today I'm going to go the digital route and show you how to modify an old point-and-shoot camera to capture IR images. It's cheap, and it' fun. We'll start with an old digital point-and-shoot camera, in this case a Toshiba PDR-M70.
 The PDR-M70 is a chunky old camera that has the good fortune of borrowing the lens and sensor assembly of the Canon G1, one of my favourite digital cameras. It has a nice high-speed f2.0-f3.0 zoom lens and a sensor which, at least at its base ISO, produces pretty solid pictures. And now we're going to cut it open.
You'll need the camera itself, a screwdriver, a piece of glass (I've used an old skylight filter), a glass cutter, a piece of exposed film leader, and some tape. You may also want to have some tweezers on hand.
1) Remove the battery to prevent damage to the camera and yourself.

2) Remove the screws that hold the camera together.

You may want to place the screws in a convenient film container so they don't get lost.

3) Gently take the camera's two halves apart.

Don't yank: you may have missed a screw or, depending on the camera you're dissecting, you may have to pry some plastic clips open before the two halves can be separated.
DO NOT TOUCH THE FLASH CAPACITOR OR ITS CONNECTORS!! Basically do not touch anything in the flash assembly: even though the battery is removed, it can still give you a rough shock.

4) The PDR-M70 is mercifully simple inside, and the sensor assembly is easily visible as soon as you split the casing (apologies for the blurry image.)

Unclip the data cable leading to the sensor assembly and move it aside.

5) Remove the screws holding the sensor to the lens assembly and store the screws in another film case.

6) Gently lift the sensor off the lens assembly.

7) The blue glass filter you see here is the IR filter. You'll need to remove it, and in this camera, it's a simple matter of popping it out with a screwdriver. Your camera may differ.

8) Here's the filter out of the camera.

Place the filter on your replacement glass, and trace its outline

9) Score the glass along your traced lines, and snap it.

Be careful with this step, because you're going to end up with a sharp-edged glass square and a bunch of smaller glass bits. Here is the new filter next to the old one:

10) Drop the new filter into the recess previously occupied by the IR filter.

Here it is properly seated:

11) now you just need to reverse the disassembly and put the camera back together.
 Click.
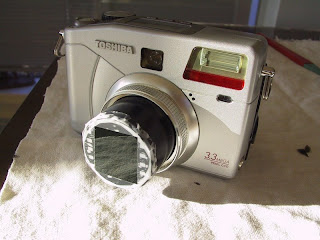
 12) Now we make an IR-pass filter for the front of the lens, to minimize the amount of visible light reaching the sensor. You can buy a proper glass IR filter, or do it the cheap way with a piece of exposed colour negative film.

Just cut it to fit, and tape it to the front of the lens.

Looks ridiculous, but it works: the true spirit of DIY. You can also use a completely black frame of slide film, but don't use black and white film, because it's not gonna work.
13) That's it! The camera is done.

You now have a fully functional camera that shoots infrared pictures like this:

More here.
If you take on this project, be aware that the camera you choose to modify will probably be constructed differently than the PDR-M70 I used, so some of the steps I've listed above may differ. And your camera may require some sensor adjustment to get the focus correct (the softness in the IR pictures above is due mostly to a sensor that still needs a bit of prodding)
It's not dead simple, but basically, if you're inclined to tinkering, you should be able to figure it out. GIve it a try!

2 comments:
what if you just replace the filter with the film?
Do you battery and card for this camera?
Post a Comment