I've been asked for some samples of what our rental lenses are capable of- specifically, the 85mm f2.8 PC-Micro-Nikkor.

In addition to being an exceptionally sharp macro lens, the PC-Micro-Nikkor's big tricks are its tilt/shift abilities. What these allow is greater control over distortion and plane of focus, similar to what large-format cameras are capable of.
Shifting moves the lens off its axis, in any direction. This is mostly useful for architectural photography, but it can also be used to slide your viewpoint off-axis without moving the camera. So if you need to take a picture featuring some kind of reflective surface, and you want to make sure the camera doesn't appear in the image, shifting the lens may let you get away with it.
Tilting is more interesting for creative photography. When you take a picture, the area in focus is a slice of your subject parallel to the film or sensor plane. To illustrate:
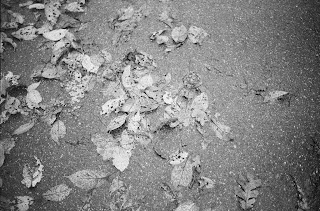
 If you tilt the lens, the area in focus tilts, too. So instead of having that in-focus area parallel to the sensor plane, you can lay it down against your subject so that more appears in focus:
 Both of these ruler pictures were taken at the same aperture from the same spot.
Especially useful for macrophotography, where depth of focus can be a real problem, you can also get great effects from this technique in portraiture and landscapes. National Geographic published an excellent Hurricane Katrina photo essay taken with a Speed Graphic large-format camera, which features the kind of selective focus effects the 85mm f2.8 PC-Micro-Nikkor is capable of.
Part of our rental fleet, the 85mm f2.8 PC-Micro-Nikkor rents for $35/day.
 Infrared photography is getting more and more popular, and with good reason: it's a lot of fun, and can give some fantastic effects. There are plenty of ways to shoot infrared, both film and digital. Our last update mentioned our stock of infrared film, which makes shooting IR pictures as easy as dropping a roll of film in your camera and attaching a filter.
But if you want to shoot digitally, you've got a few options. Digital sensors are actually very sensitive to infrared light, and the only reason you can't just go ahead shoot IR with most cameras is a simple filter placed in front of the sensor. So to shoot infrared with a digital camera, the trick is to somehow remove that filter.
You can have a DSLR modified- an expensive proposition- or you can use a simple point-and-shoot camera and get a similar effect. So today I'm going to go the digital route and show you how to modify an old point-and-shoot camera to capture IR images. It's cheap, and it' fun. We'll start with an old digital point-and-shoot camera, in this case a Toshiba PDR-M70.  The PDR-M70 is a chunky old camera that has the good fortune of borrowing the lens and sensor assembly of the Canon G1, one of my favourite digital cameras. It has a nice high-speed f2.0-f3.0 zoom lens and a sensor which, at least at its base ISO, produces pretty solid pictures. And now we're going to cut it open.You'll need the camera itself, a screwdriver, a piece of glass (I've used an old skylight filter), a glass cutter, a piece of exposed film leader, and some tape. You may also want to have some tweezers on hand.1) Remove the battery to prevent damage to the camera and yourself.
 2) Remove the screws that hold the camera together.
 You may want to place the screws in a convenient film container so they don't get lost.
 3) Gently take the camera's two halves apart.

Don't yank: you may have missed a screw or, depending on the camera you're dissecting, you may have to pry some plastic clips open before the two halves can be separated.
DO NOT TOUCH THE FLASH CAPACITOR OR ITS CONNECTORS!! Basically do not touch anything in the flash assembly: even though the battery is removed, it can still give you a rough shock. 4) The PDR-M70 is mercifully simple inside, and the sensor assembly is easily visible as soon as you split the casing (apologies for the blurry image.)

Unclip the data cable leading to the sensor assembly and move it aside.
 5) Remove the screws holding the sensor to the lens assembly and store the screws in another film case.
 6) Gently lift the sensor off the lens assembly.
 7) The blue glass filter you see here is the IR filter. You'll need to remove it, and in this camera, it's a simple matter of popping it out with a screwdriver. Your camera may differ.
 8) Here's the filter out of the camera.
 Place the filter on your replacement glass, and trace its outline
 9) Score the glass along your traced lines, and snap it.

Be careful with this step, because you're going to end up with a sharp-edged glass square and a bunch of smaller glass bits. Here is the new filter next to the old one: 10) Drop the new filter into the recess previously occupied by the IR filter.
Here it is properly seated: 11) now you just need to reverse the disassembly and put the camera back together.
 Click.
12) Now we make an IR-pass filter for the front of the lens, to minimize the amount of visible light reaching the sensor. You can buy a proper glass IR filter, or do it the cheap way with a piece of exposed colour negative film.
 Just cut it to fit, and tape it to the front of the lens.
 Looks ridiculous, but it works: the true spirit of DIY. You can also use a completely black frame of slide film, but don't use black and white film, because it's not gonna work.13) That's it! The camera is done.
 You now have a fully functional camera that shoots infrared pictures like this:
 More here.
If you take on this project, be aware that the camera you choose to modify will probably be constructed differently than the PDR-M70 I used, so some of the steps I've listed above may differ. And your camera may require some sensor adjustment to get the focus correct (the softness in the IR pictures above is due mostly to a sensor that still needs a bit of prodding)
It's not dead simple, but basically, if you're inclined to tinkering, you should be able to figure it out. GIve it a try!
We have a bunch of interesting film and a few cool cameras to talk about this week.Cameras first: we have a nice Voigtlander Bessa R2A, one of the newer Voigtlander-branded Cosina rangefinder cameras. These are modern rangefinder cameras with the standard Leica M-mount bayonet, TTL meters, and a big, clear viewfinder. They're compatible with nearly every Leica M lens out there, plus a multitude of 39mm screw-mount lenses available for earlier cameras. They're well-made, metal-bodied cameras- I've been using a similar R3M for a few years now, and it's been nothing but reliable.The R2A has an electronically-controlled shutter, and operates in full manual or aperture-priority mode. If you've never used a rangefinder camera before, come in and have a look- the R2A is a good one, and sells for a fraction of what a similarly-specced Leica would. Our Voigtlander Bessa R2A is in excellent condition both cosmetically and functionally, and is priced at a very reasonable $369.The second camera is a bit of an older one:
 This is a very clean Zeiss-Ikon Ikonta 524/2, a classic 6x9cm medium-format folding camera. It has a clean 105mm f3.5 Novar Anastigmat lens, fully functional shutter, and a built-in uncoupled rangefinder. These old folding cameras are great, shooting huge pictures on 120 rollfilm and collapsing down to a size that's easily packable into nearly any camera bag (or pocket, I suppose, if your coat is big enough.) This Ikonta is in-store now and priced at $129.On the film front, we've brought in a selection of some harder-to-find emulsions, including three different varieties of infrared film.
 Ilford SFX200 is an ISO200 black-and-white film sensitive to wavelengths up to roughly 790nm. We have SFX200 available in both 35mm and 120 formats.
 Rollei IR400 is a slightly faster film with approximately the same infrared sensitivity as the Ilford SFX200. We have only 35mm cartridges of the Rollei IR400 at the moment, but we'll be getting more 120 soon.
 Efke IR820 is not an ISO820 film: the name refers to its infrared sensitivity, which at 820nm makes this more of a "true" infrared film than either the Ilford or the Rollei. Efke IR820 is available in 35mm and 120 formats.
 Rollei Digibase is a special C41-process black and white emulsion specifically designed for scanning. Its polyester base has no colour mask, and lies flatter than standard film bases to ensure edge-to-edge sharpness. Available in 35mm and 120 formats.And finally, for the classic camera fans, a special treat:
 127 film! This is a smaller rollfilm format used by Rolleiflex 44 and Yashica 44 cameras, as well as many other older cameras. This is not a common film- the 127 format has been out of mass production for more than a decade now- but Efke still makes it, and we've got some. It's a nice-quality ISO100 black and white film, with a silver-rich emulsion that gives great classic-looking photos.That's it for this week. Be sure to check our used inventory at www.camera-traders.com for all the rest of our stock- and contact us if you have any questions about these or other cameras.
 I like stuff that works the way it's supposed to.
With its light leaks and distorted, vignetted pictures, the original Holga gained a cult following for its results- and a reputation for being a terribly-built little machine that might or might not produce usable results on any given roll of film. At least it was honest: it never promised anything other than the occasional lucky accident. And if you knew its limitations, you could use it to take pictures with some degree of confidence.But I had my suspicions, when I saw the 3D Holga, that the same company which could barely build a simple camera had decided to produce a more complicated version. Making one shutter trip when you press a button is one thing, but synchronizing a pair of shutters is quite another. Would it even work? Much to my surprise, the 3D Holga actually does work- and it works well. The pictures it produces are exactly what you'd imagine: distorted, vignetted, and occasionally discoloured, just like you'd see from the original, except in 3D.
It works by taking two side-by-side 6x6cm images at the same time, which means you get 6 pictures per roll of film. The two lenses are focused individually, and film advance is accomplished the old-fashioned way, reading numbers through a little red window. It's all as simple as can be.
 The camera is very similar to the standard Holga, with the same lens (times two) and the same general body shape and build quality. But like the Holga Wide Pinhole camera, which we wrote about last month, there have been a few improvements: the shutter button is now equipped with a built-in cable release socket, the dual flash units have the later Holga's built-in colour wheel, and the extra heft makes the camera feel a bit more substantial.
 The manual recommends using 400-speed slide film, which can later be cut and fitted into 3D slide mounts for viewing with the (optional, $39 +tx) viewer. But you can shoot negative film just as easily, and view the prints or scans by other means, including the entirely free (but somewhat undignified) method of crossing your eyes. I'm still experimenting with viewing techniques, so watch this space- I'll try to post any breakthroughs.
 In the meantime, the 3D Holga is probably the cheapest way to get big, bright medium-format stereo pictures, and I'm having a great time with mine. More sample pictures are available here.
The 3D Holga includes a cable release and two lens caps- plus an instruction manual- and it's available now for $169 +tx.
Contact us or stop in to our shop for more information.
We've got a few interesting cameras to feature this week. I'll start with my favourite:
 The Optina Ic is a compact, fixed-lens rangefinder camera with a streamlined design that seems inspired by mid-century science fiction movies.
The body is satin chrome with bright chrome accents and black leatherette. With its bottom-mounted wind lever and top-mounted (but retractable) rewind knob, the Optina sports a very clean and distinctive silhouette.
The lens is a 50mm f2.8 Isco-Gottingen Isconar. Shutter speeds are accurate and the rangefinder is clear: this is a fully usable camera that only coincidentally happens to look like a robot from the moon. The price is $69 +tx.
 This Rolleiflex T is a very nice classic TLR. Its 75mm f3.5 Zeiss Tessar is clean and sharp, and its shutter works well from 1/4s and up (though the 1/2s and 1 second settings are a touch slow.) The body is in very nice condition, and the controls operate smoothly.
The Rolleiflex cameras are some of the finest medium-format twin-lens reflex cameras available, taking big 6x6cm exposures on 120 rollfilm. Their quiet, steady shutters are excellent for discreet or low-light photography, and their workmanship is top-notch. If you've wanted to see what medium-format photography is about, here's your chance.
This camera is ready and able to shoot great pictures, but its minor low-speed shutter issue means that it's bargain-priced at $169 +tx.
 If the Rolleiflex sounds a bit too complicated, you might enjoy this Spartaflex. It's a stripped-down, box-style camera with a few notable differences: for one, it uses common 120 rollfilm instead of the discontinued box-camera standby, 620. For another, it features adjustable apertures to control your exposure and depth of field. And it even has a true focusable lens in the twin-lens style. It's kind of like a Rolleiflex, but maybe a bit more fun.
The Spartaflex includes a flash and one flashbulb, which I'd recommend saving for a special occasion. Still, it makes for a good-looking package, and it can be yours for only $89 +tx.
 Finally, we have this beautiful, nearly like-new Olympus OM-2. If there's a single thing you need to know about the OM series, it's that they have a phenomenally large viewfinder- probably the biggest, brightest image you'll see in an SLR. But of course, there's more to it than that.
The OM-2 is a surprisingly compact, solid-feeling camera backed by a system of exceptional (and, in my opinion, underrated) lenses. The camera's shutter speed settings are unconventionally located around the base on the lens, on the front of the camera- not on the top like most cameras. It may take some getting used to, but you'll see why it's a good idea as soon as you hold the camera to take a picture: the focus, aperture, and shutter speed controls are at your fingers.
The OM-2 is a great choice if you're looking for a manual camera, and there aren't too many examples in such clean condition. Our price, including a nice Zuiko 50mm lens, is $249 +tx.
If you're interested in any of these cameras, or if you have any questions, be sure to contact us by phone or e-mail as soon as possible: we only have one of each of these cameras, and once they're gone, it may be a while before we find another.
This is only a tiny sample of our inventory. We get dozens of new items a week, and you can see a frequently-updated list at www.camera-traders.com
 This trick has made its way around the web a few times, but it's still a pretty neat experiment that not everyone is aware of: developing film using instant coffee.
The recipe calls for some instant coffee granules, washing soda, and water- that's it. For anyone who sees darkroom chemicals as mysterious black-box alchemy, it's a bit of a revelation that standard household chemicals can pull an image off a roll of film.
Instant coffee is available pretty much everywhere (I found an old container in the cupboard). Washing soda- not baking soda- used to be nearly impossible to find in Victoria, but I found some at both Fairway Markets and Thrifty Foods. It seems that it's been rediscovered as an economical and environmentally-friendly cleaner, which is good news for anyone interested in scrubbing up grease or developing film.
So here's the setup:
 We have an exposed film (Fuji Neopan 1600 exposed at ISO 800), a developing tank, coffee, and washing soda. Not shown, but also necessary: some fixer, and a dark place to load the film into the tank. You can use stop bath if you want, but since we're on an all-natural kick here, I've used plain water.
The developer mix is 5 teaspoons of coffee and 2 teaspoons of washing soda in 300ml of water, enough to fill the developing tank to the appropriate level. Fair warning: it smells like day-old pan grease.
Developing time is pretty long (20 to 30 minutes), and fixing time in water is not exactly speedy either (I gave it roughly 10 minutes), but the final results are actually kind of interesting.
The negatives themselves are heavily stained and extremely dark, and the images are low in contrast and fairly grainy, but they also have a look that's very much unlike what you'd get out of a modern purpose-made developer.
The look is pleasant and luminous, and the images display well both on paper and on screen. If you're at all interested in processing film, this is a method I'd highly recommend- not only for its novelty value, but for the very nice results.
Easy-to-follow instructions are available here on the excellent Photo Utopia blog, and the results from my own roll are here.

You may have noticed that we're now offering equipment for rent. Renting is a great way to get access to equipment that's too expensive, uncommon, or strange to justify a full purchase. For example, everyone wants to play around with a fisheye lens, but not too many people are willing to pay the $500-$900 it takes to buy one. That's where renting comes in handy.
We're starting out mostly with a selection of lenses for Canon EOS and Nikon, the systems for which we've gotten the most requests.
Our Canon lenses include a 15mm f2.8 fisheye lens ($30 a day) and the 100-400mm f5.6 L ($35 a day)- plus the very unique 65mm f2.8 MP-E super-macro lens ($25 a day) that provides magnification starting at 1:1 life-size and extending all the way to 5:1. You have to see in action to really appreciate it.
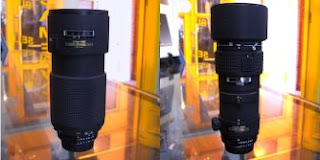
 Nikon lenses include the 80-200mm f2.8 AF-D ED ($25 a day) and the 300mm f4 AF ED ($20 a day)... mostly telephoto choices at the moment, but we're working on finding some good wide-angle lenses.
We've also got a single Minolta/Sony Alpha lens, but it's a nice one: a 16mm f2.8 fisheye lens. It's not an easy lens to find, and it can be yours for $30 a day.
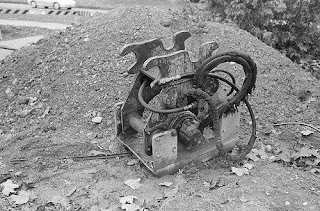
 If you need lighting for a shoot, we have available a two-strobe Multiblitz Compactlite outfit with umbrellas and stands. This is a great portable outfit for studio or location work, and it's renting for $40 a day.
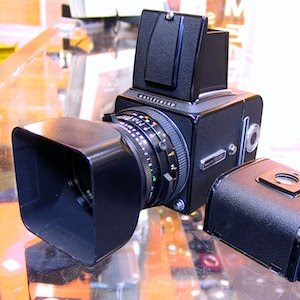
And if you're interested in trying out a nice medium-format camera, you can take home a Hasselblad 500c/m for $40 a day- including two film backs and an 80mm f2.8 lens.
There's plenty more available, too. Visit our rentals page for a full list and a downloadable copy of our rental contract- and keep checking back, because we'll have more gear available soon.


